DIY Boat Shrink Wrapping - Everything You Need to Know
 Constructing a shrink wrap cover on a boat can seem intimidating for a first-time D.I.Y. shrink wrapper. However, shrink wrapping a boat becomes much less intimidating once you know what tools and supplies you'll need, and what needs to be done. In this article, you'll get a great idea of the general procedure for wrapping most power boats. Along the way, you'll learn which products or materials you'll need to make a shrink wrap cover that will protect your boat all season long and then some. If you were wondering what supplies you'll need to wrap a boat and how to do it - you're in the right place! We'll cover, from start to finish, each step of shrink wrapping a boat. At the end of this article, you'll find a list of all the materials and products mentioned. That list will give you a summary of what supplies you'll need for wrapping your boat. Let's get started!
Structure is Key
The first and arguably most important step of shrink wrapping a boat is creating the structure on which the shrink wrap will lay. If shrink wrap is simply pulled over a boat with no prepared structure, the shrink wrap will have to bridge large gaps between high and low points on the boat with large voids in-between. This will put unnecessary stress on the shrink wrap and, over time, it will likely lead to failure of the cover. An issue like water gathering and pooling can weigh down and stretch the shrink wrap until it eventually fails. This sort of problem can be easily avoided by creating a structure on the boat that bridges gaps between high and low points on the boat so the shrink wrap has support when laying over the voids.
 This structure is made from Cross-Woven Polyester Strap and consists of five different elements:
- 3/4" wide Center Strap
- 3/4" wide Perimeter Strap
- 1/2" wide Ribbing
- 1/2" Drop Loops
- 1/2" wide Belly Band
Center Strap
The Center Strap creates a peak and forms the highest parts of the structure. It can be thought of as the spine of the structure. It is set up along the length of the boat from bow to stern in the very middle of the width of the boat, sitting above everything. Install your 3/4" strap in a Strap Dispenser and place it on the stern. Pull the 3/4" strap over the middle of the boat the long way. Run the strap out past the bow rail, down and around the back of the front-most stanchion, behind the matching stanchion on the other side, out past the bow rail and back up above the bow rail. Securely tie the strap to itself. This should create a small triangle of strap at the front of the boat. While the Center Strap is still loose and in position, prepare for the Ribbing.
The Ribbing will be set up to cross the Center Strap. Where the Center Strap runs front to back, the Ribbing runs side to side. In order to prevent the Ribbing from sliding around over top of the Center Strap, small loops must be tied in the Center Strap itself before installing the Ribbing. Mr. Shrinkwrap's suggestion is to make the loops in the Center Strap in line with each stanchion. Starting at the bow, pull your Center Strap away from the bow by hand in a straight line pointing to what will be the highest point of the Center Strap. Tie a loop in the Center Strap. Do this at each stanchion, working away from the bow of the boat. If the boat to be wrapped does not have an arch, a loop will be needed behind the windshield (in line with cleats on the side of the boat if possible). Once back at your Strap Dispenser, leave yourself enough slack to comfortably join the strap with another section of the Center Strap coming from the stern, then cut the strap off the dispenser. You'll want about 2 to 3 feet of overlap with the next section of Center Strap to join them easily. Tie your strap coming from the dispenser either around the skinny part of the engine, passing through the mounting bracket against the stern, or tie your strap around a sturdy rail on the stern. Bring your two sections of Center Strap together, leaving 2 to 3 feet of overlap to work with, then cut the strap from the dispenser. Using a 3/4" Self Locking Metal Buckle, join the two loose ends of Center Strap together, and pull taught by hand.
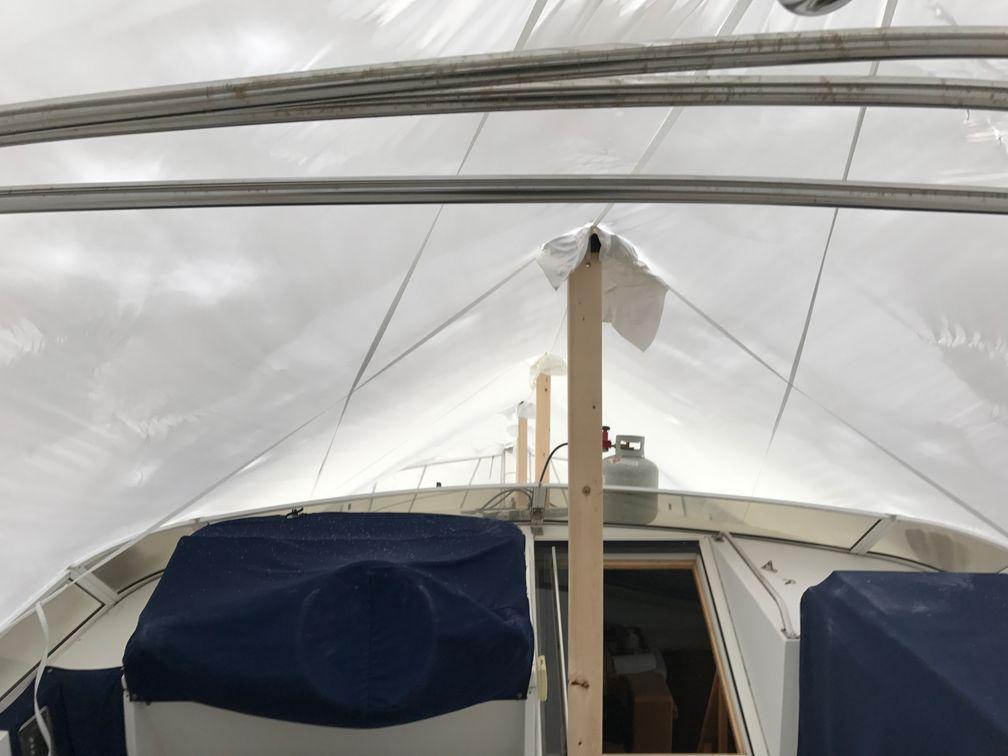
Support Posts
To install support posts under the loops in the Center Strap, measure the height of the hand-tightened Center Strap under each loop. Cut 2" x 4" posts to the heights measured. Once cut to length, slide a Bottom Cap on the bottom of the post and an End Cap on the top of the post. Drill a hole just below the End Cap on each post. This will allow each post to be tied to a loop in the Center Strap. Set your posts under the loops in the Center Strap and tie them in place by passing 1/2" strap through the drilled hole in the post and through the loop in the Center Strap. Check your support posts to make sure they are upright and straight underneath the Center Strap. Next, using a Strap Tensioning Tool, tighten your Center Strap at the metal buckle. Tighter is better of course, but be careful not to damage the boat or bend the metal buckle. Once tightened, tie your tail end of extra strap around the buckle, and cover the buckle with a piece of 2" Preservation Tape to keep the sharp points of the buckle from damaging shrink wrap as it is pulled or shrunk over the buckle.
 Ribbing / Side Straps
Now the Center Strap is secure and the support posts are in place under the Center Strap. Spine complete! Time for the Ribbing. Using 1/2" wide strap, starting at the bow, feed the strap side-to-side through the forward-most loop in the Center Strap, above and past the bow rail, and tie to the stanchion. Return to your roll of strap, pull some slack, and tie a loop in your 1/2" strap halfway between the Center Strap and the matching stanchion. Give yourself enough strap to wrap over the bow rail, down around the stanchion and back up over the bow rail to the loop you tied in the 1/2" strap, add a foot extra, then cut the 1/2" strap from the roll. Wrap your loose end of 1/2" strap over the bow rail, down and around the stanchion, back above the bow rail and through the loop in the 1/2" strap. Pull tight and securely tie. Repeat this for each loop in the Center Strap, working toward the stern. Once each loop has a rib going through it, the Ribbing is complete.
With the Center Strap and Ribbing complete, you're ready to make your Drop Loops.
Drop Loops & Perimeter Strap
Using 1/2" wide strap, tie the strap around the bottom of a stanchion. Imagining how low you want the shrink wrap to cover the hull of the boat, tie a loop in the strap and cut the strap from the roll. Repeat this on each, or every other stanchion until you have a series of loops hanging at the same height around the hull of the boat. The Drop Loops are complete. Now that the Drop Loops are finished, the Perimeter Strap can be made. Using 3/4" wide strap, feed the strap through every bottom loop of each Drop Loop. Once the 3/4" wraps all the way around the boat, use a 3/4" Self-Locking Metal Buckle to secure the strap to itself. Check to see that your Drop Loops are hanging straight down and keeping the Perimeter Strap where you like it, then tighten the Perimeter Strap at the metal buckler using the Strap Tensioning Tool. You'll have to reach a hand behind the Perimeter Strap, so don't crank it too tight. Tie the tail end of the strap to the metal buckle, and wrap the buckle in a piece of 2" Preservation Tape. The structure is now complete!
Padding
Now that the structure is in place, you have a better visual representation of where the shrink wrap will lay. Using 1/8" x 6" Foam Padding, and 2" Preservation Tape, apply foam over any area of the boat which might poke through or get caught on the shrink wrap. Areas to consider are the handles and ends of antennae, horns, and points of windshields. Feel free to also tape some padding around sharp points of the anchor if your anchor will be inside the shrink wrap. Padding is done!
 Time for the Shrink Wrap
Shrink wrap can now be pulled over the boat. To see whether you have chosen the right width of Shrink Wrap, measure from one side of the Perimeter Strap, up and over the tallest and widest point of the boat, back down to the other side of the Perimeter Strap, then add two or three feet. The extra two or three feet will provide enough width to cover the boat and wrap under the Perimeter Strap and back up the hull a bit on both sides of the boat. These few extra feet of shrink wrap are needed so that the shrink wrap can be heat-welded to itself and secured to the Perimeter Strap. After confirming you have an adequate width of shrink wrap, position the roll at the back of the boat on a pole and Shrink Wrap Stands. Set the orientation of the roll so that when you begin pulling the shrink wrap off the roll, the folded layers of shrink wrap face up. Cut off a piece of 3/4" strap about ten feet long, bunch up the beginning of the shrink wrap and tie the strap to the shrink wrap - this will allow you to pull the shrink wrap from on the boat. Begin pulling the shrink wrap up and over the stern. Make sure that you're guiding the shrink wrap above everything down the length of the Center Strap, making your way to the bow of the boat.
Watch out for anything the shrink wrap might get caught on - it's not too late to add another piece of padding! Once you've pulled the shrink wrap to the edge of the bow, pull several more feet down to cover the anchor or front point of the hull. Carefully walk back to the stern, adjusting the shrink wrap so it is centered on the Center Strap as you go. Back at the roll of shrink wrap, ensure that you provide yourself enough shrink wrap to meet and extend past the Perimeter Strap at the middle of the stern. Cut the shrink wrap off the roll using a Shrink Film Knife.
The shrink wrap is now sitting on top of the Center Strap. Begin carefully unfolding the shrink wrap. Keep in mind that pulling too hard on one side may cause the shrink wrap to fall off the Center Strap and become crooked, and if you pull hard enough, the shrink wrap can come completely off the boat. Be careful and take your time. After the shrink wrap is completely unfolded, check to make sure the shrink wrap is still able to be tucked up behind the Perimeter Strap against the hull of the boat on all sides.
Welding Your Shrink Wrap
Now, secure the shrink wrap to the Perimeter Strap at the middle of the side of the boat. (Safety First: Always have a fire extinguisher nearby, and pay attention to the areas of shrink wrap that have been heated.) Ensure that a second layer of shrink wrap is tucked up behind the outer layer, making a "U" around Perimeter Strap, then, using your Propane Heat Gun and a Welding Glove, apply heat to the overlapped area of shrink wrap and pat it together while it's still hot to weld the two layers of shrink wrap together. Do this once on each side of the boat to secure the shrink wrap in place and to be sure it cannot move from its position. Then, repeat the heat welding process around the whole Perimeter Strap. If any area of the shrink wrap lays against the boat in such a way that it creates three layers of shrink wrap, cut out the middle layer with a Shrink Film Knife, making sure to leave a big enough overlap of two layers to make another heat weld. At the bow of the boat, cut the shrink wrap so it's easy to make a single heat weld going up the point of the hull, with your cut edge of shrink wrap landing on one side of the point of the hull - this will help with taping your seams later. Typically, the angle change of the Center Strap will cause three overlapping layers on both sides of the boat below the highest point. Cut out the middle layer and weld together. All heat welding (or "fusing") should now be complete. Next is Belly Bands.
Belly Bands
Securing the shrink wrap to the Perimeter Strap keeps the shrink wrap in place, but what keeps the Perimeter Strap from pulling up as the shrink wrap shrinks? Belly Bands. Using a razor knife carefully, pull the Perimeter Strap away from the hull slightly and make a 1/2" slit in the welded shrink wrap just above the Perimeter Strap in the middle of the side of the wrap. Be extra careful not to cut into the Perimeter Strap. Push 1/2" strap through the slit and tie the 1/2" strap around the Perimeter Strap. Pass the still-attached roll of 1/2" strap under the boat. Pull the Perimeter Strap away from the hull and make another slit on the opposite side of the wrap, in line with the first slit. Make a loop in the strap under the boat about a foot or two away from the Perimeter Strap. Measure enough strap to go around the Perimeter Strap, back through the new loop, and add a foot or two extra, and cut it to that length. Feed the strap through the slit, around the perimeter strap, then through the loop. Gently pull tight, and tie secure. Do not pull Belly Bands very tightly. The purpose of Belly bands is only to keep the Perimeter Strap from rising, not to pull the shrink wrap tighter. Now that the first Belly Band is secured in the middle of the boat, add a few more Belly Bands on both sides of the first to keep the Perimeter Strap completely in place.
Shrinking Your Wrap with Heat Guns (Safety First)
Structure, Padding, Shrink Wrap, Welds, and Belly Bands are now in place. Shrinking of the shrink wrap can now begin. (Safety First: Always have a fire extinguisher nearby, and pay attention to the areas of shrink wrap that have been heated.) Using your Propane Heat Gun with a 6 ft Extension, begin applying heat to the shrink wrap. If it's your first time using a propane heat gun, it's very easy to learn the feel of it by moving the flame of the heat gun in a sweeping motion, starting the heat gun a foot or two away, and slowly moving closer to the surface of the shrink wrap. This will provide you with a great feel for how close or far your flame needs to be in order for the film to become hot enough to begin shrinking. Be careful not to shrink any areas twice. Keeping the heat on one spot or trying to shrink an area twice can result in burning a hole in the shrink wrap. When in doubt, keep the heat moving and be cautious. Shrink all the shrink wrap you can from the ground, and then carefully use a ladder where necessary to finish the upper sections. Everyone knows that the shrink wrap begins to shrink immediately once it's heated enough, but what a lot of people don't know, is that shrink wrap also continues to shrink as it's cooling.
Once the shrink wrap is shrunk, Shrink Film Tape can be applied over the seams of the welds to prevent water from getting in any gaps between the layers of the welds. Shrink Film Tape is not meant to shrink or have intense heat applied to it. Cover every seam with 4" Shrink Film Tape. Instead of ripping the tape from the roll by hand, cut the tape from the roll by using a Shrink Film Knife to avoid fraying or wavy edges that may being to peel away over time. Tape over any small holes that may have been made while shrinking as well.
Keeping Your Boat Dry with Ventilation
Having moisture trapped under the wrap is no good. We want to let the air under the cover ventilate. Install Shrink Wrap Vents on both sides of the boat every six feet or so to provide great ventilation for your wrap and avoid unwanted mold or mildew. For Stealth Vents, push down the sharp point of the vent, and pierce the shrink wrap in a motion going toward the high spot of the wrap. Push the vent in until the shrink wrap wedges itself into small cutouts near the wide end of the vent. Use a small piece of Shrink Film Tape to further secure the vent. For all other vents, estimate or trace the size of the hole you'll need to cut in the wrap, then cut it out. Peel off the non-stick adhesive protection strips and apply the vent by pushing the adhesive against the shrink wrap. Further secure the vent with a piece of shrink film tape if you like.
 Accessing Your Boat
The last step of installing a Zipper Door is optional. Installing a Zipper Access Door, is quite easy. Use 4 small pieces of shrink film tape to hold the corners of the Zipper Door in place where you want it. Unzip the door to make sure the zipper is free to move as it should, then zip it closed. Once the door is in place where you like it, apply 4" Shrink Film Tape along each edge of the door to secure the door to the shrink wrap. Start by taping along the bottom edge, then the sides, then along the top edge. This gives a nice "shingle effect" that will not allow any rain behind the zipper door. The door is now affixed to the shrink wrap. Unzip the door and cut out the shrink wrap access point either slightly smaller than the shape of the zipper, or slightly larger than the shape of the zipper. Cutting your access point to the same size and shape of the zipper can cause the zipper itself to catch the film and get sometimes get jammed. After your access point is cut out, zip the door closed and you're done.
You Did It!
Congratulations, your shrink wrap installation is complete! Your boat is now protected from the elements for months! Feel free to keep an eye out for any sticky snow that might weigh down and test your shrink wrap installation, but if you followed the instructions in this article, your wrap should hold up very well!
Have a great season!
Mr. Shrinkwrap
Summary of Tools and Materials Used:
Cross-Woven Polyester Strap (1/2" and 3/4")
3/4" Wide Strap
Strap Dispenser
Razor Knife
3/4" Self Locking Metal Buckle
2" x 4" Lumber
Bottom Cap
End Cap
Drill with a 1/2" Wood Bit
Strap Tensioning Tool
2" Preservation Tape
1/2" Wide Strap
1/8" x 6" Foam Padding
Shrink Wrap Stands
Metal Pole
Shrink Film Knife
Fire Extinguisher
Propane Heat Gun
Welding Glove
6 ft Extension
4" Shrink Film Tape
Shrink Wrap Vents
Stealth Vents
Zipper Access Door
